Updating the BIOS on your ASUS motherboard can seem daunting, but it is a crucial step to ensure your system runs smoothly. To update your ASUS motherboard BIOS, you can use the EZ Update tool within Windows or the USB BIOS FlashBack feature. These methods are user-friendly and designed to guide you through the process without hassle.
Using the EZ Update, which is accessible through the AI Suite 3 software, you can easily update your BIOS online.
The USB BIOS FlashBack function allows you to update BIOS from a USB drive, even without a CPU installed.
Each method has its specific steps, ensuring you have options depending on your setup and comfort level.
Preparing for the BIOS Update
Before updating your ASUS motherboard BIOS, you need to identify your motherboard model, check the current BIOS version, download the correct update, and create a backup of your current BIOS.
Follow these steps to ensure a smooth update process.
Identifying Your Motherboard Model
First, you need to identify your ASUS motherboard model. Locate the model number on the motherboard itself. It’s often printed on the motherboard’s surface and can also be found on the box it came in.
If you cannot physically check, you can use software tools like CPU-Z.
- Open CPU-Z.
- Go to the “Mainboard” tab.
- Find the “Model” field.
This information is crucial for downloading the correct BIOS update.
Checking the Current BIOS Version
Knowing your current BIOS version ensures you download an update that is compatible and necessary.
You can check your BIOS version through the BIOS setup utility or within your operating system.
- Restart your computer.
- Press the designated key (usually Del or F2) during startup to enter BIOS.
- Look for the BIOS version on the main screen.
Using Windows:
- Open the Command Prompt.
- Type wmic bios get smbiosbiosversion.
- Press Enter.
Note the BIOS version for the next steps.
Downloading the Correct BIOS Update
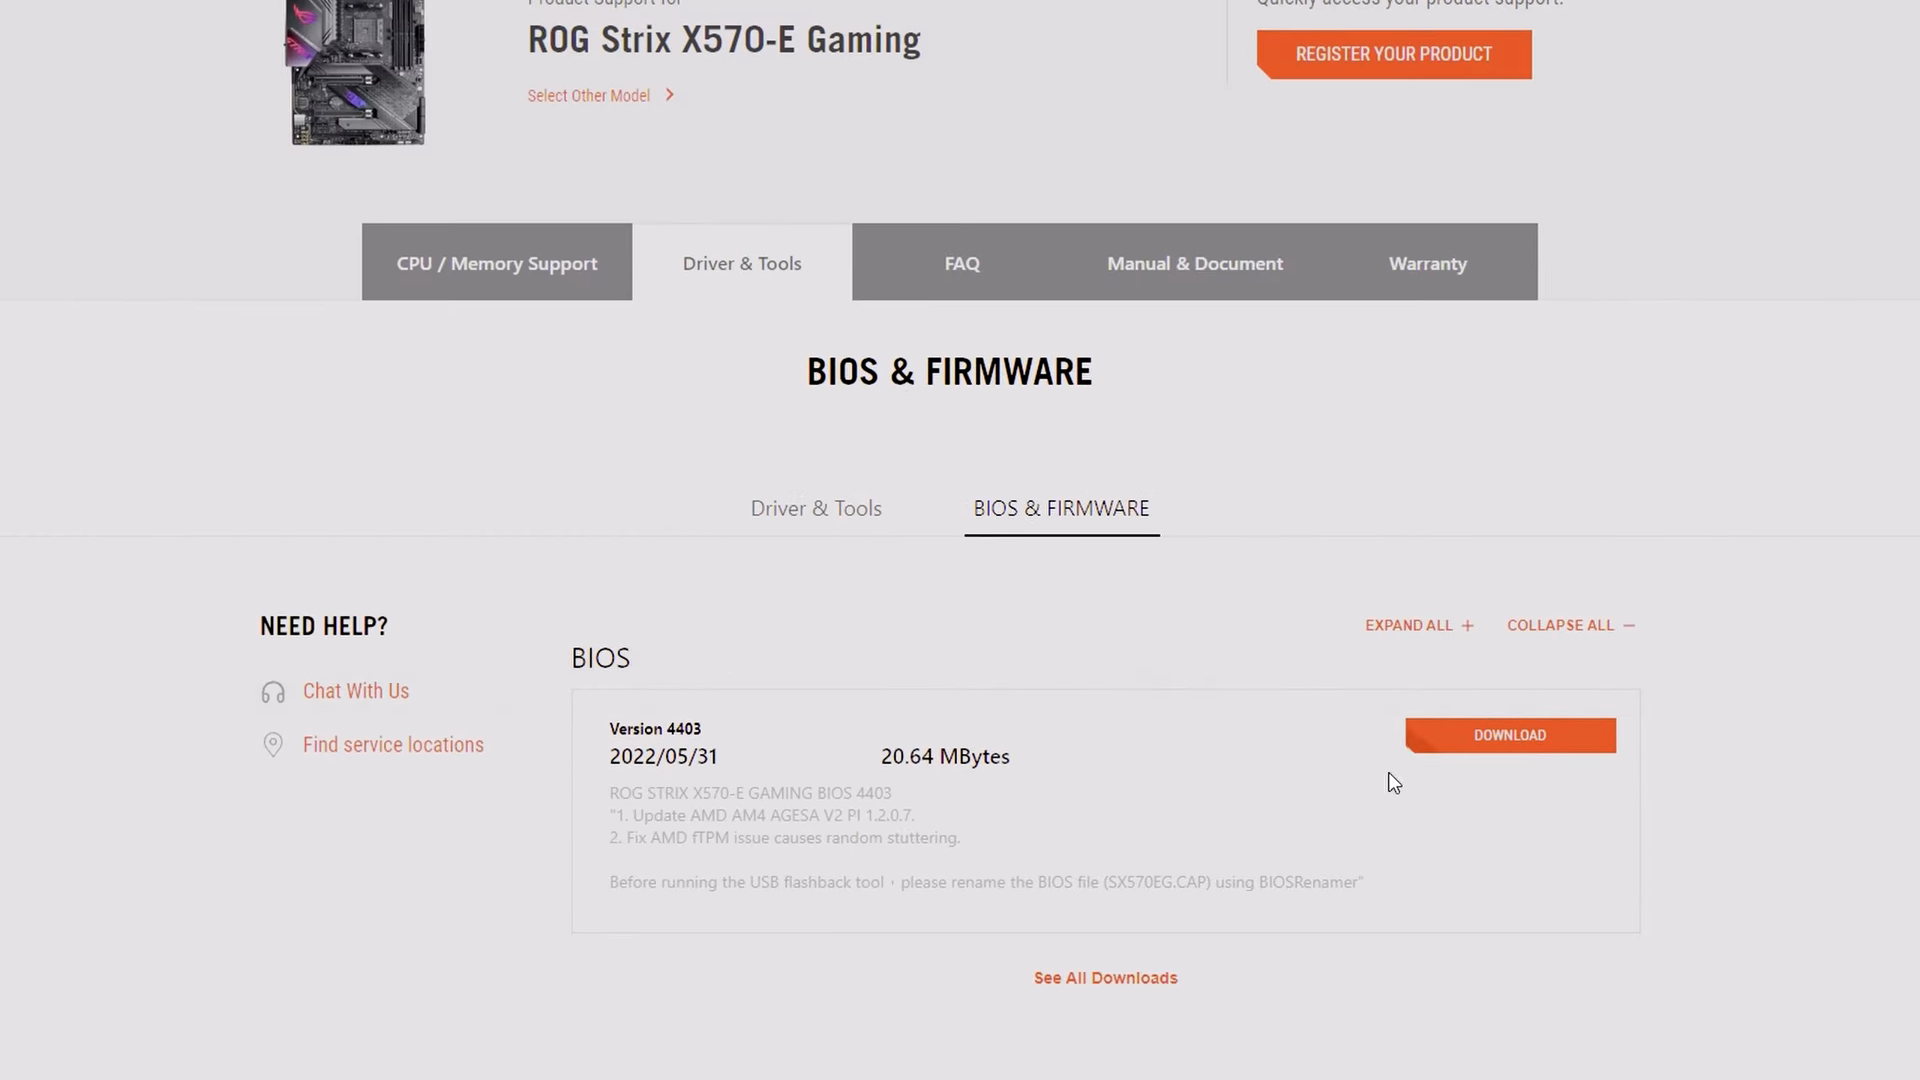
Visit the ASUS Download Center to find the appropriate BIOS update. Ensure that the update matches your motherboard model and current BIOS version.
- Go to the ASUS support website.
- Enter your motherboard model in the search bar.
- Navigate to the “BIOS & Firmware” section.
- Download the latest BIOS update that matches your current BIOS version.
- Save the BIOS file to a USB flash drive formatted as FAT32.
Creating a Backup of Your Current BIOS
Backing up your current BIOS protects you in case something goes wrong during the update. ASUS motherboards often include tools to assist with this.
- Enter the BIOS setup utility on startup.
- Navigate to the “Tool” section.
- Select “ASUS EZ Flash”.
- Choose “Backup”.
- Save the backup to a secure location, such as your USB drive.
- Having a backup ensures you can restore your system if the update fails.
By following these steps, you prepare your system properly, reducing the chances of issues during the BIOS update process.
Updating BIOS via EZ Flash Utility
Updating your BIOS using the EZ Flash Utility involves entering the BIOS utility, selecting the EZ Flash tool, and going through the update process.
Here’s how you can do it step-by-step.
Accessing the BIOS Utility
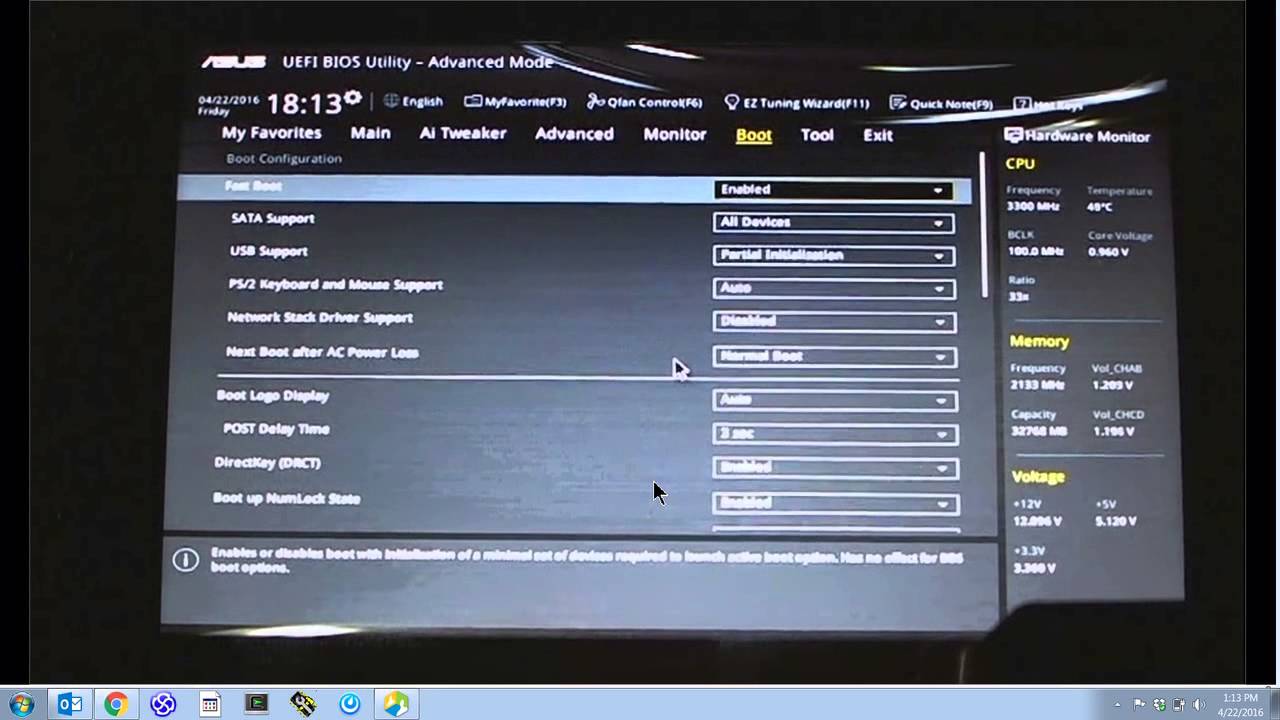
First, you need to enter the BIOS utility of your ASUS motherboard. Restart your computer and when the ASUS logo appears, press the DEL key on your keyboard. This should bring up the BIOS screen.
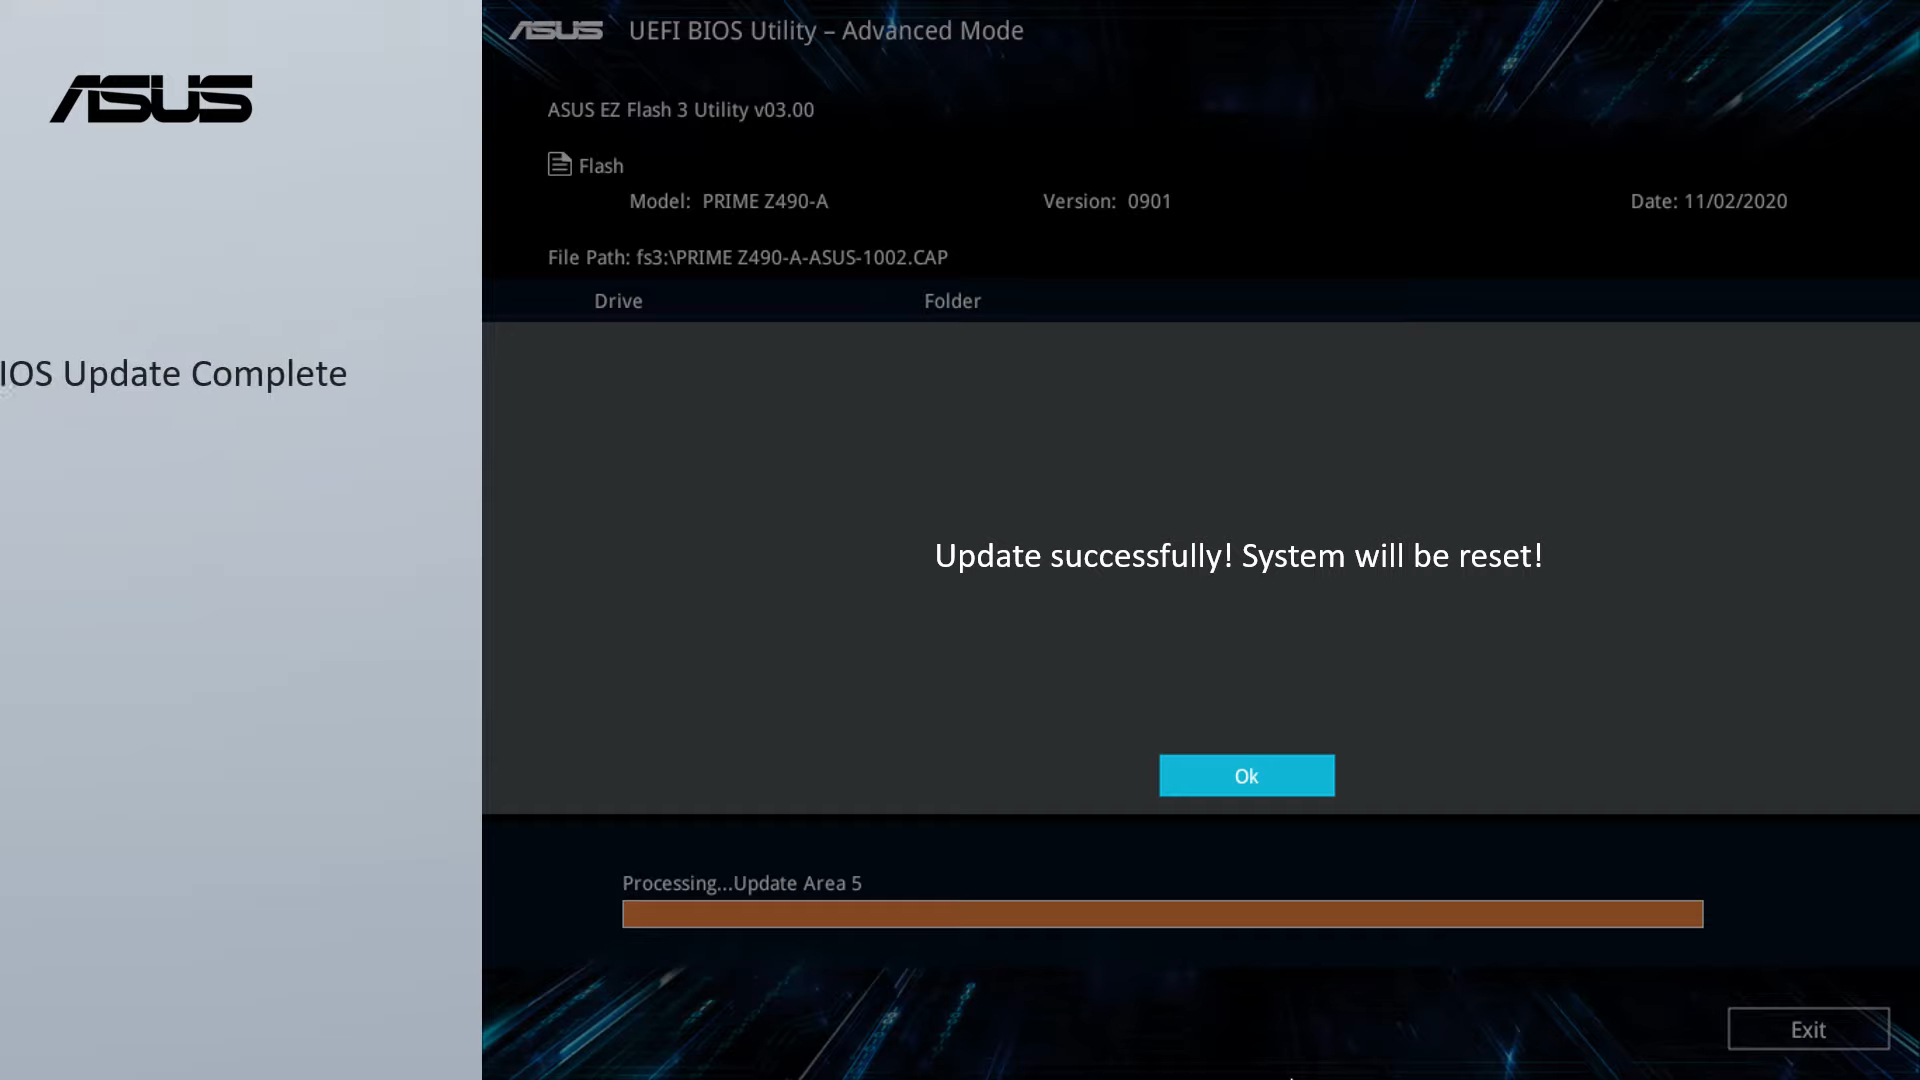
Once you’re in the BIOS, press F7 to switch to Advanced Mode. Then, navigate to the [Advanced] screen. You should see the ASUS EZ Flash 3 Utility option here. Select it using the arrow keys and press Enter.
Using ASUS EZ Flash 3 to Update BIOS
Now you need the BIOS update file, usually in a .CAP format. Download this from the ASUS official website and save it to a USB drive. Insert the USB drive into your computer.
In the ASUS EZ Flash 3 Utility, select the USB drive from the list of storage devices. Locate the .CAP file on the USB drive and select it.
Confirm that you wish to update the BIOS. The utility will start the update process, which may take a few minutes. Your screen may go blank, and the system might restart during this process.
Restarting After BIOS Update
After the BIOS update is complete, the system will prompt you to restart. Ensure your power supply is stable during this process to avoid any issues.
Press Enter to restart your system. When the system reboots, enter the BIOS again to confirm that the update was successful. You should see the new BIOS version indicated in the BIOS menu.
If everything looks correct, you can exit the BIOS and allow your system to boot normally. Your BIOS update via the EZ Flash Utility is complete.
Manual BIOS Update Procedures
You can update your ASUS motherboard BIOS manually in two primary ways: using the ASUS AI Suite 3 software or the USB BIOS Flashback feature. Each method has specific steps, and it’s important to follow them carefully to ensure your update is successful.
Updating Through ASUS AI Suite 3

The ASUS AI Suite 3 is a utility that allows you to update your BIOS directly within Windows.
- Download and Install AI Suite 3: Make sure that you download the latest version from the ASUS website.
- Open AI Suite 3: Once installed, launch the software.
- Navigate to EZ Update: Find and open the EZ Update feature within the suite.
- Select the BIOS Update Option: Click on the update button and choose the BIOS file you have downloaded.
- Confirm and Update: Confirm that you want to update the BIOS. The software will handle the rest.
While this method is generally safe and convenient, it is crucial to ensure a stable power supply during the process to avoid corrupting the BIOS.
Using the USB BIOS Flashback Feature
USB BIOS Flashback allows you to update the BIOS without entering the operating system.
- Download the BIOS File: Go to the ASUS support site, download the latest BIOS version for your motherboard, and rename it according to the instructions on the site.
- Prepare the USB Drive: Format a USB drive to FAT32 and copy the renamed BIOS file to the root directory.
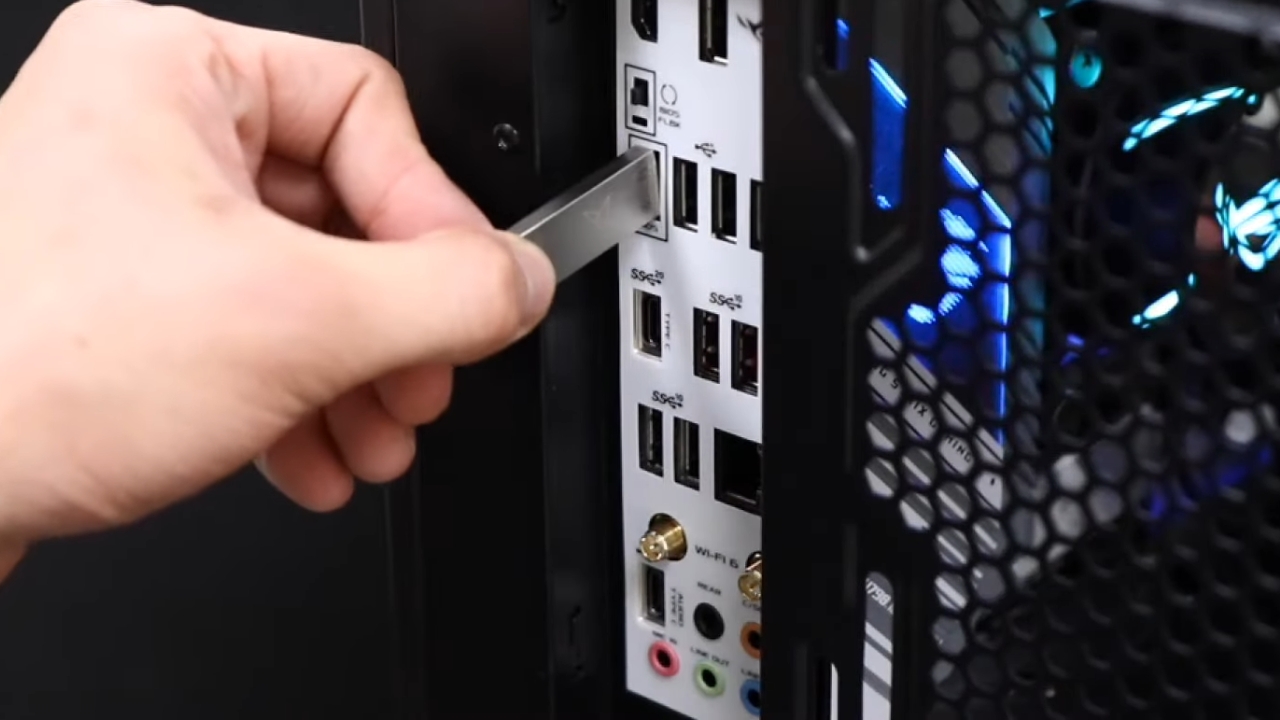
- Power Down the PC: Shut down your computer but keep it plugged into the power supply.
- Insert the USB Drive: Plug the USB drive into the designated USB BIOS Flashback port.
- Initiate Flashback: Press the USB BIOS Flashback button on the motherboard. Hold it until the LED indicator starts blinking.
- Wait for Completion: The indicator will blink until the update is complete. Do not interrupt this process.
This method is ideal for cases where the system isn’t bootable. Make sure you strictly follow each step to avoid complications.
Post-Update Considerations
After updating the BIOS on your ASUS motherboard, it is crucial to ensure the new version is running smoothly, address any issues that may arise, and update related software and drivers for full compatibility and performance.
Verifying the BIOS Update
First, confirm that the BIOS update was successful. Restart your computer and enter the BIOS setup by pressing the “Del” key during boot.
Check the BIOS version displayed on the main screen to ensure it matches the version you updated to.
It’s also a good idea to check the system stability and performance. Run your computer under normal usage and observe if everything is working as expected.
Tip: Keep the BIOS update file and your USB drive handy in case you need to re-apply the update.
Troubleshooting Potential Issues
In case you encounter issues like system instability or performance drops post-update, there are a few steps to follow. First, reset the BIOS settings to default by entering the BIOS setup and selecting the “Load Default Settings” option.
If the problem persists, consider re-flashing the BIOS update. Sometimes, the update may not apply correctly the first time. Ensure your USB drive is properly formatted and the update file is correctly placed.
For serious issues, you might need to contact ASUS support or visit an authorized service center.
Updating Drivers and Software
Updating the BIOS only covers part of the system’s firmware. After a BIOS update, it’s important to check and update other drivers and utilities for full compatibility.
Visit the ASUS support website and download the latest versions of chipset drivers, graphic drivers, and any other relevant software.
Updating these drivers ensures that your system can handle the new BIOS version without any compatibility problems.
- Visit the ASUS support website.
- Search for your motherboard model.
- Download the latest drivers and utilities.
- Install each driver, restarting the system if necessary.
The Bottom Line
Updating the BIOS on your ASUS motherboard can significantly improve your system’s performance. Make sure you identify your motherboard model and BIOS version before starting the update process.
Remember, updating your BIOS may carry risks, so ensure you follow the steps carefully. If you encounter any issues, consult the ASUS support website for further guidance.
By following these steps, you can ensure your ASUS motherboard is up-to-date and running smoothly.