Share Post:
Ever wanted how to ger into Windows 10 without leaving your current operating system?
I was in the same boat not too long ago. Setting up a virtual machine sounded daunting, but guess what?
It’s a thrilling tech adventure that you can tackle with ease!
Let me guide you through the process of setting up Windows 10 ISO in VirtualBox, and together we’ll explore this exciting digital frontier.
What You’ll Need
- VirtualBox: The virtualization software we’ll use.
- Windows 10 ISO file: The image of the Windows 10 installation media.
- A dash of curiosity: Because we’re about to embark on a fun tech journey!
Step 1: Download and Install VirtualBox
1. Visit the VirtualBox Website
- Head over to the VirtualBox official site and navigate to the Downloads section.
2. Choose Your Host Operating System
Select the version that matches your current OS—Windows, macOS, Linux, or Solaris.
3. Install VirtualBox
Run the installer and follow the on-screen prompts. It’s as simple as installing any other application. I remember feeling a bit like a tech wizard watching the progress bar fill up!
Step 2: Obtain the Windows 10 ISO File
1. Go to the Microsoft Website
- Visit the Microsoft Windows 10 download page.
2. Download the ISO
Choose the edition of Windows 10 you prefer and click on “Confirm.” Select your language, confirm again, and then choose the 64-bit or 32-bit download based on your needs.
Quick Tip: Most modern systems support 64-bit. Unless you have a specific reason, go with that.
3. Save the ISO File
It’s a hefty download, so it might take a while. Grab a coffee or stretch your legs while you wait. I used the time to tidy up my desk—multitasking for the win!
Step 3: Create a New Virtual Machine in VirtualBox
1. Launch VirtualBox
- Open up VirtualBox. The sleek interface always gets me excited for the possibilities ahead.
2. Click on “New”
This button is like opening the door to a new world.
3. Name Your Virtual Machine
Give it a name—something like “Windows 10 VM” works. Choose “Microsoft Windows” as the type and “Windows 10” as the version.
4. Allocate Memory (RAM)
VirtualBox will suggest a memory size. I usually allocate at least 2048 MB (2 GB), but if you have more RAM to spare, feel free to allocate more for better performance.
5. Create a Virtual Hard Disk
Select “Create a virtual hard disk now” and click “Create.”
6. Choose Hard Disk File Type
Go with “VDI (VirtualBox Disk Image)” unless you have a specific reason to choose otherwise.
7. Storage on Physical Hard Disk
Select “Dynamically allocated.” This means the virtual hard disk will grow in size as needed, saving space on your actual hard drive.
8. Set Disk Size
Allocate at least 32 GB to ensure Windows 10 has enough space. I usually go for 50 GB to be safe.
9. Finish Up
Click “Create,” and voilà! Your virtual machine is set up.
Step 4: Configure Your Virtual Machine
1. Access Settings
With your new VM selected, click on “Settings.”
2. Adjust System Settings
- Motherboard Tab: Ensure “Floppy” is unchecked in the boot order. You can leave “Optical” and “Hard Disk” checked.
- Processor Tab: Allocate more CPU cores if you can. I usually assign at least two for smoother performance.
3. Configure Display
In the “Display” section, increase the Video Memory to 128 MB. This helps with graphical performance.
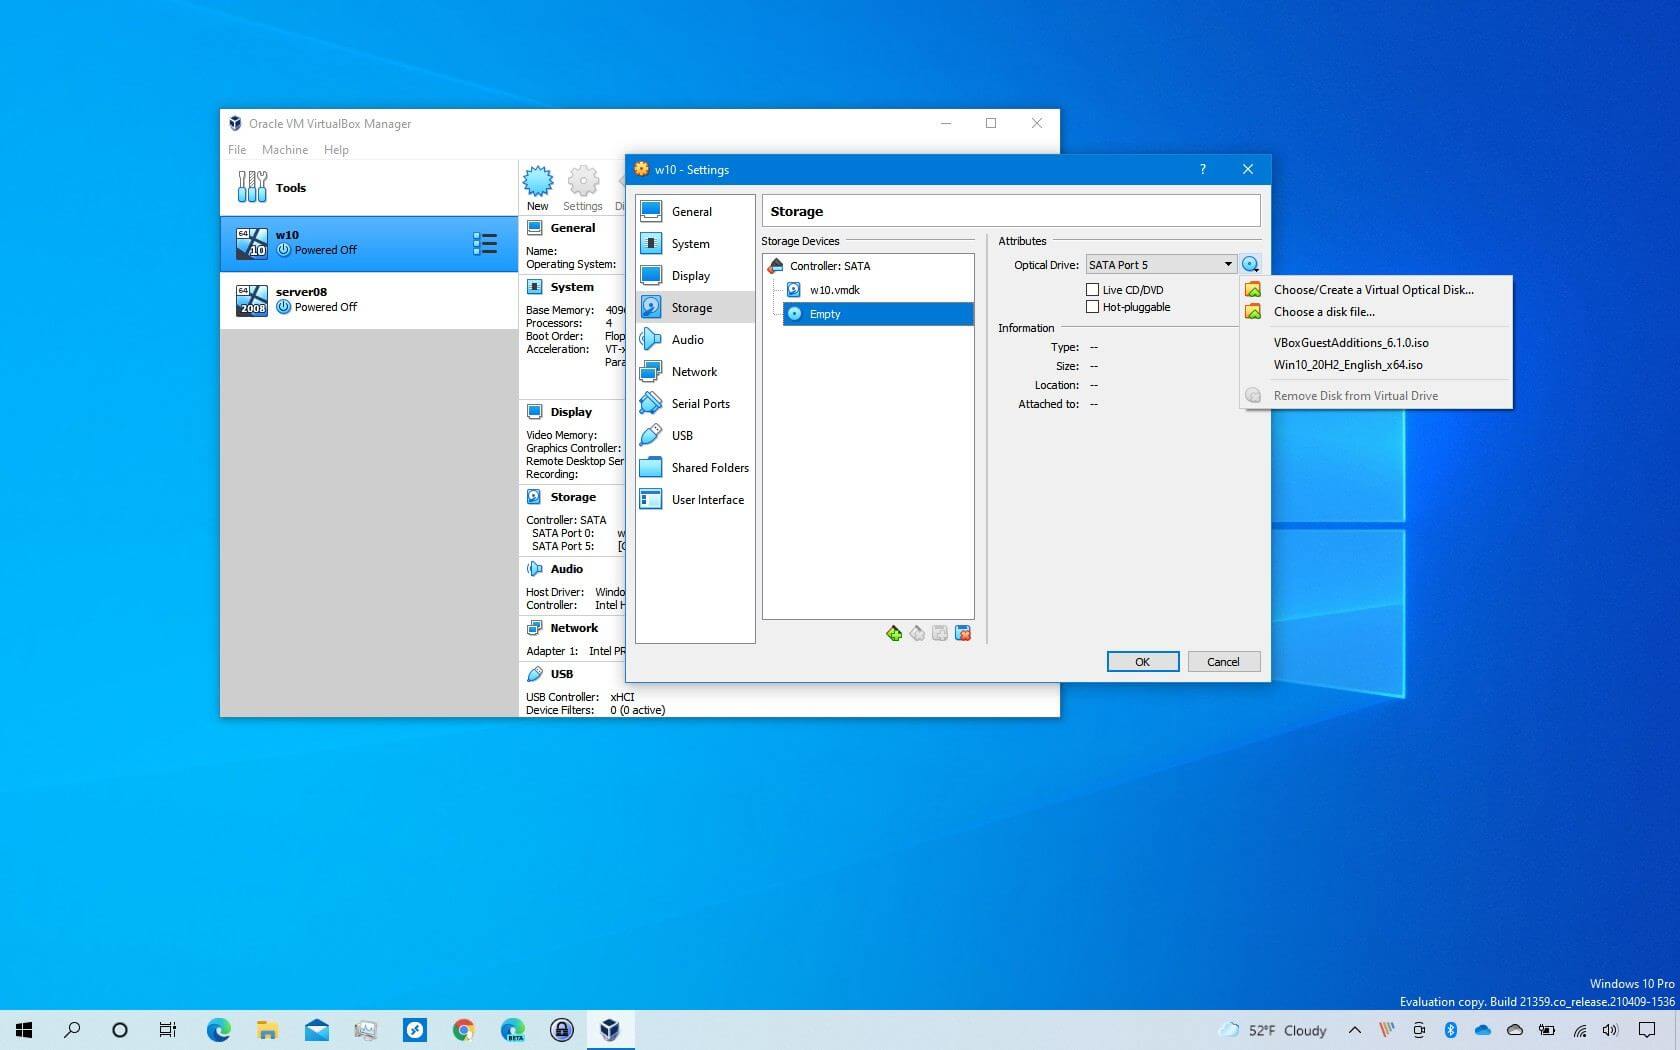
4. Attach the Windows 10 ISO
- Go to the “Storage” section.
- Under “Storage Devices,” click on the empty CD icon labeled “Empty.”
- On the right, click the CD icon next to “Optical Drive” and select “Choose a disk file.”
- Navigate to where you saved the Windows 10 ISO and select it.
5. Save Settings
Click “OK” to save all your configurations.
Step 5: Install Windows 10 on Your Virtual Machine
1. Start the Virtual Machine
Select your VM and click “Start.” The VM will boot up using the Windows 10 ISO.
2. Begin Windows Installation
You’ll see the Windows logo, and the installation process will begin. This part made me feel like I was setting up a brand-new computer!
3. Choose Language and Preferences
Select your language, time and currency format, and keyboard input method. Click “Next,” then “Install now.”
4. Enter Product Key
If you have a Windows 10 product key, enter it here. If not, click “I don’t have a product key.” You can proceed without one, but some features may be limited.
5. Select Windows Edition
Choose the edition you want to install—Home or Pro—and click “Next.”
6. Accept License Terms
Read through (or scroll down) and accept the license terms, then click “Next.”
7. Choose Installation Type
Select “Custom: Install Windows only (advanced).”
8. Select the Virtual Hard Drive
You’ll see the virtual hard drive you created earlier. Select it and click “Next.”
9. Let Windows Install
The installation will proceed. This is another good time to take a short break. I took the opportunity to refill my coffee.
Step 6: Finalize Windows Setup
1. Configure Windows Settings
Once installation is complete, Windows will restart, and you’ll be guided through setup.
- Region and Keyboard Layout: Confirm your region and preferred keyboard layout.
- Connect to a Network: If prompted, you can set this up now or choose to do it later.
2. Set Up Account
You can sign in with a Microsoft account or create an offline account. I usually go with an offline account for virtual machines.
3. Customize Settings
Choose your privacy settings and other preferences. Feel free to disable features you’re not comfortable with.
4. Finish Setup
Windows will take a few moments to finalize everything. You’ll soon see the Windows 10 desktop!
Step 7: Install VirtualBox Guest Additions
To enhance your virtual machine’s performance and usability, you’ll want to install Guest Additions.
1. Insert Guest Additions CD Image
- With your VM running, click on “Devices” in the VirtualBox menu.
- Select “Insert Guest Additions CD image.”
2. Run the Installer
- Open “File Explorer” in your VM.
- Navigate to the CD drive where Guest Additions is mounted.
- Run “VBoxWindowsAdditions.exe.”
3. Follow the Installation Wizard
Go through the prompts, accepting the default options. You’ll need to reboot the VM after installation.
4. Enjoy Enhanced Features
Guest Additions will enable features like:
- Better Video Support: Adjust the VM window size freely.
- Shared Clipboard: Copy and paste between your host and VM.
- Shared Folders: Share files between systems easily.
Step 8: Exploring Your New Virtual Machine
Congratulations! You’ve successfully set up Windows 10 in VirtualBox. Now you can:
- Install and test software safely.
- Access Windows-specific applications.
- Customize your VM settings for optimal performance.
I remember the first time I reached this point—I felt like I’d unlocked a new level of tech savvy!
Troubleshooting Tips
- Performance Issues: Allocate more RAM or CPU cores in the VM settings.
- Network Problems: Check that your VM’s network adapter is set to “NAT” or “Bridged Adapter.”
- ISO File Issues: Ensure your Windows 10 ISO is not corrupted. Re-download if necessary.
Related Posts:
- How to See Your Old Instagram Bios: Step-by-Step…
- What Is USB Selective Suspend Setting? Should You…
- How To Enable Or Disable Fn Lock Key In Windows
- Windows 10 Won't Boot with a Black Screen? 3 Ways to Fix It
- Windows 10 Not Booting After Update? Here is the Quick Fix
- How to Get Administrator Privileges on Windows 10 (4…