If you’re looking to manage Secure Boot for your ASUS motherboard, you’ve come to the right place.
To enable Secure Boot, go to the BIOS setup, find the ‘Secure Boot’ option under the Boot or Security section, and set it to ‘Enabled’.
This step is essential for ensuring the integrity of your system’s boot environment.
Disabling Secure Boot involves a similar process. You’ll enter the BIOS setup, navigate to the ‘Secure Boot’ option, and switch the setting to ‘Disabled’.
This flexibility allows you to control your system’s security features based on your specific needs.
Preparing to Modify Secure Boot Settings
Prerequisites
Before making changes to Secure Boot settings on your ASUS motherboard, you’ll need to access the BIOS/UEFI interface.
To do this, restart your computer and press the Del key or F2 key during the boot process.
Make sure you are familiar with navigating the BIOS menu. If your system is in EZ mode, switch to Advanced Mode by pressing F7.
You’ll also need to ensure that your system is configured for UEFI mode rather than Legacy mode. Navigate to the Boot tab and establish that UEFI is selected under Boot Mode.
Back-Up Important Data
You can use external storage devices such as USB drives or external hard drives to create backups of your essential files. For a more comprehensive solution, consider using cloud storage options like Google Drive, OneDrive, or Dropbox.
Additionally, create a system restore point. For Windows users, use the built-in System Restore utility to create a backup of your operating system’s current state. This can help you roll back to a previous configuration if you encounter any issues.
Restart Your Computer

You can do this by navigating to the Start menu and selecting the Power button, followed by choosing Restart.
Another method is by pressing the Ctrl + Alt + Delete keys simultaneously and selecting Restart from the options that appear.
Important: Make sure to save any ongoing work before restarting to prevent data loss.
Entering BIOS/UEFI Setup
For most ASUS motherboards, this key is the Delete (Del) key or the F2 key. As soon as your computer begins to restart, start repeatedly pressing the required key until the BIOS/UEFI setup screen appears.
You may briefly see the ASUS logo or an instruction indicating which key to press, so be prepared.
These steps are crucial for configuring settings like Secure Boot. Once in the BIOS/UEFI, you can navigate through various menus to make the necessary changes.
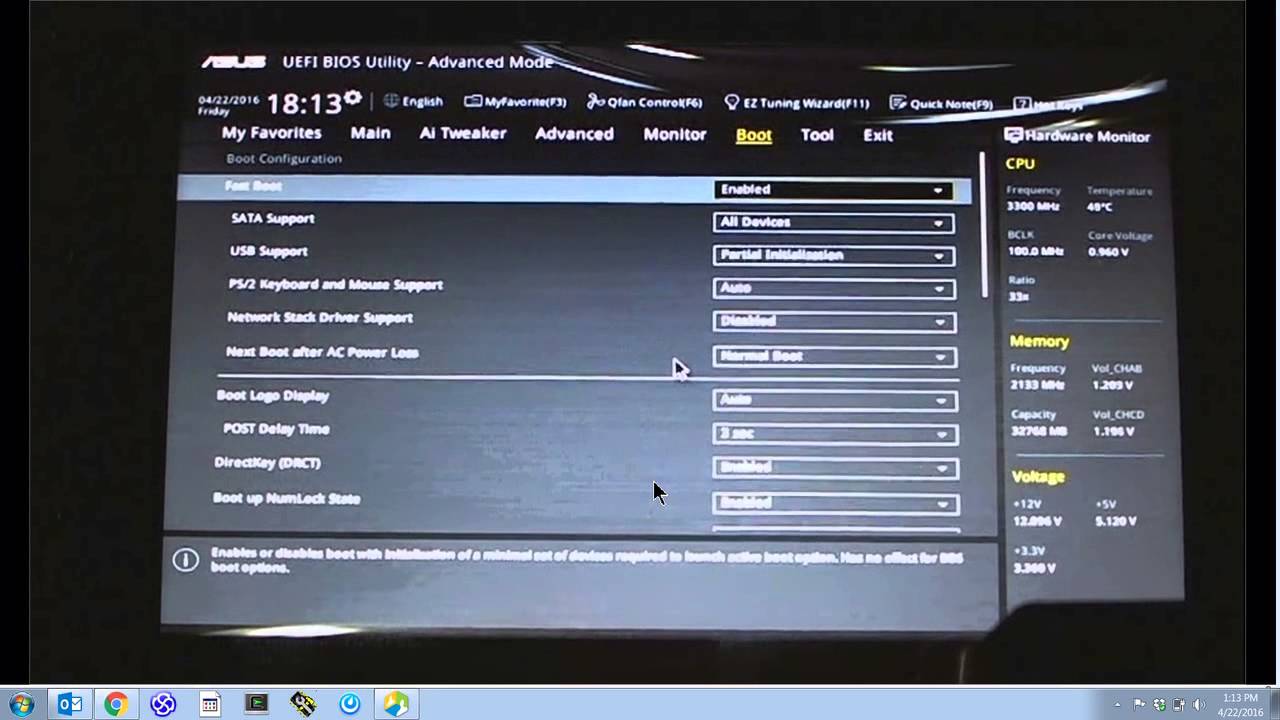
Navigating the ASUS BIOS/UEFI Interface

This interface may vary slightly depending on your motherboard model but typically features a tabbed layout at the top.
The tabs usually include Main, Advanced, Boot, Security, and Exit. You navigate between these tabs using the arrow keys on your keyboard.
F7 often switches you into Advanced Mode, providing more configuration options. This mode offers more granular settings compared to the EZ Mode.
Locating the Secure Boot Option
To enable or disable Secure Boot, move to the Security tab in the BIOS/UEFI interface. Within this tab, you will find the Secure Boot option.
Press Enter to open the Secure Boot menu. Next, select Secure Boot Control and set it to either Enabled or Disabled depending on your need. If the Secure Boot option isn’t visible here, check under the Boot tab.
In the Boot tab, look for the OS Type setting and switch it to Windows UEFI Mode to enable Secure Boot, or Other OS to disable it. To finalize the changes, navigate to the Exit tab and select Save Changes and Reset.
Step-by-Step Process for Enabling Secure Boot
- Enter BIOS Configuration: Restart your computer. During startup, press and hold the [Del] or [F2] key to enter the BIOS configuration screen.
- Navigate to Boot Menu: Once in the BIOS, go to the Boot tab. Use the arrow keys to navigate.
- Disable CSM (Compatibility Support Module): Locate the CSM (or Legacy Boot), and set it to Disabled. This option ensures that the system uses UEFI firmware.
- Access Secure Boot Menu: Go back to the Security tab and find the Secure Boot option.
- Set Secure Boot Mode: Choose Secure Boot Control and set it to Enabled. If this option is unavailable, it might be under the OS Type setting. Set it to Windows UEFI mode.
- Install Secure Boot Keys: If required, you need to install the default Secure Boot keys. Select Install Default Secure Boot Keys to proceed.
- Save and Exit: Press F10, confirm by selecting Yes, and save changes to exit BIOS.
Verifying Secure Boot Activation
- Boot to Windows: After enabling Secure Boot, allow your system to boot normally into Windows.
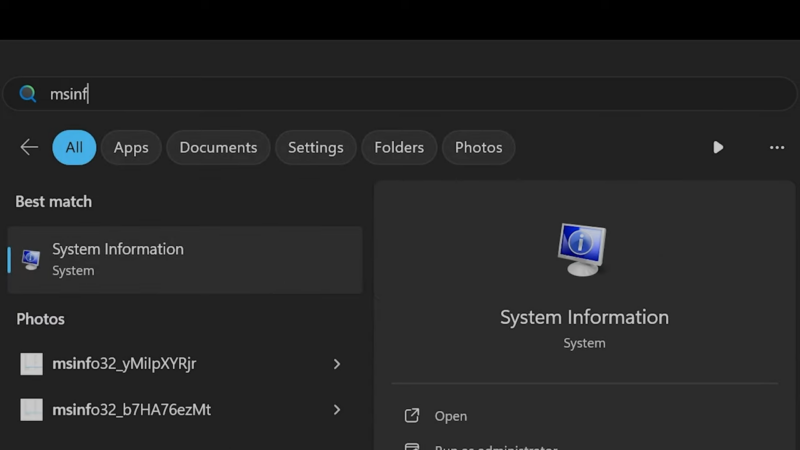
- Run System Information Tool: Press WIN + R to open the Run dialog box. Type msinfo32 and press Enter.
- Check Secure Boot State: In the System Information window, scroll down to find Secure Boot State.
- Verify Status: If Secure Boot State shows On, Secure Boot is successfully enabled. If it reads Off, then Secure Boot has not been activated.
These steps ensure that your ASUS motherboard is set up with Secure Boot, increasing your system’s defense against unauthorized access and malware.
Step-by-Step Process for Disabling Secure Boot
- Enter BIOS Configuration: Restart your computer and press the Del or F2 key during the boot process to access the BIOS.
- Switch to Advanced Mode: Press F7 to enter Advanced Mode if you’re not already there. In some cases, this might not be necessary if you’re already in Legacy Mode.
- Navigate to Secure Boot Settings: Go to the Security tab and select Secure Boot. If this option isn’t available, check under the Boot tab.
- Disable Secure Boot Control: Set Secure Boot Control to Disabled. Make sure to select OS Type as Other OS if prompted.
- Save and Exit: Press F10 and select Yes to save your changes and exit the BIOS.
Confirming Secure Boot Deactivation
- Access BIOS Again: Restart your computer and access the BIOS using the same method (
DelorF2during boot). - Check Secure Boot State: Return to the Secure Boot settings area. You should see that Secure Boot State is now showing as Off.
- Use Windows Utility: Press WIN + R, type msinfo32, and press Enter. Look for the Secure Boot State within the System Information window. It should read Off, confirming that Secure Boot is disabled.