Building your own computer can be an exciting yet daunting task. One of the trickiest parts is connecting the front panel connectors to the motherboard. These tiny connectors control your PC’s power button, reset button, and LED indicators.
Today, I’ll walk you through the process step-by-step to make it simple and easy to follow.
What Are Front Panel Connectors?
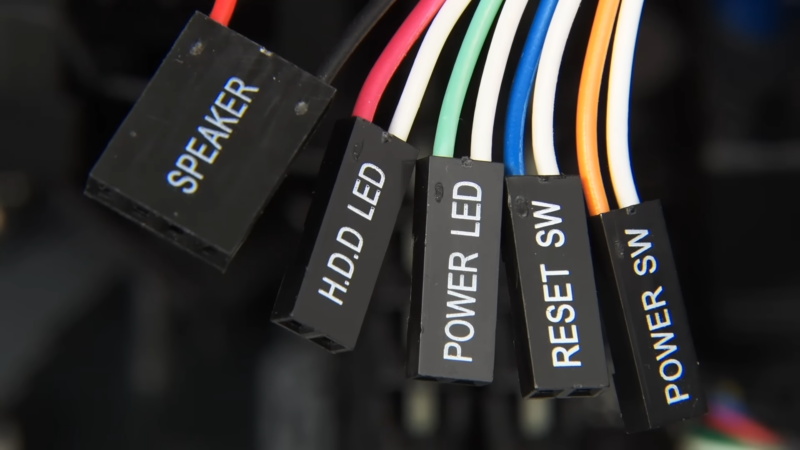
Front panel connectors are a set of pins on your motherboard that connect to the various buttons and indicators on the front of your computer case. These connectors include:
- Power switch (PWR SW): Turns your computer on and off.
- Reset switch (RESET SW): Restarts your computer.
- Power LED (PWR LED): Indicates when your computer is on.
- Hard drive activity LED (HDD LED): Shows when your hard drive is active.
- Speaker (SPEAKER): Beeps during the boot process to indicate errors.
Tools You’ll Need
Before you start, gather the following tools:
- A small screwdriver (usually a Phillips head)
- A flashlight (to see the tiny pins clearly)
- Your motherboard’s manual (for reference)
Having these tools on hand will make the process smoother and less frustrating.
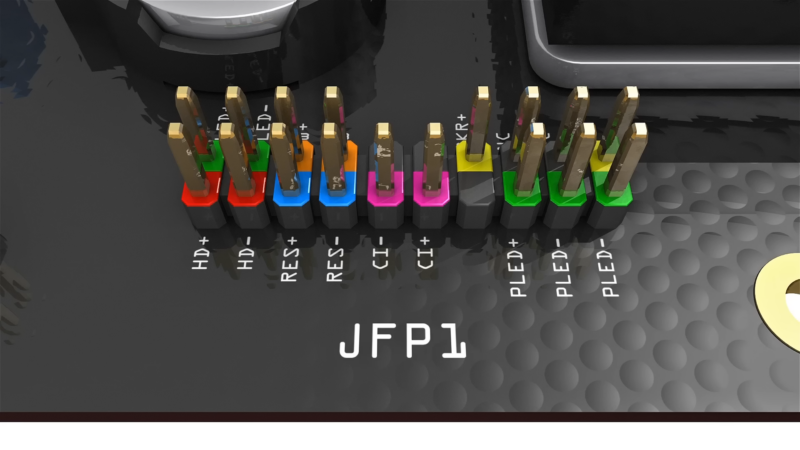
Step 1: Locate the Front Panel Header
First, locate the front panel header on your motherboard. This is a group of pins usually found at the bottom edge of the motherboard. Your motherboard’s manual will have a diagram showing the exact location and pin layout.
Step 2: Identify the Connectors
Next, identify the front panel connectors from your case. They are typically labeled with small text like “PWR SW,” “RESET SW,” “HDD LED,” etc. Refer to your case’s manual if you’re unsure.
Step 3: Connect the Power Switch (PWR SW)
Start with the power switch. Find the connector labeled “PWR SW” and match it with the corresponding pins on the motherboard. The positive and negative orientation usually doesn’t matter for switches, but it’s good practice to match the positive (+) pin.
Step 4: Connect the Reset Switch (RESET SW)
Repeat the process for the reset switch. Find the “RESET SW” connector and attach it to the appropriate pins on the motherboard. Like the power switch, the orientation isn’t crucial.
Step 5: Connect the Power LED (PWR LED)
The power LED connector typically has a positive (+) and negative (-) pin. Match the positive pin with the “+” labeled pin on the motherboard. This step is important for the LED to light up correctly.
Step 6: Connect the Hard Drive Activity LED (HDD LED)
The HDD LED connector also has positive and negative pins. Ensure you match the positive pin to the correct pin on the motherboard to get the LED working properly.
Step 7: Connect the Speaker (SPEAKER)
Finally, connect the speaker. This is often a four-pin connector, but only two or three of the pins might be used. Refer to your motherboard manual to ensure proper placement.
Common Issues
Although the whole process is pretty straightforward, there are a few issues that might occur:
PC Won’t Turn On
If your PC doesn’t turn on, double-check the power switch connection. Ensure it’s securely attached to the correct pins. Sometimes, a loose connection or improper seating can cause the PC to remain unresponsive.
Additionally, make sure that the power supply is switched on and properly plugged into the wall outlet. If these steps don’t work, try resetting the power supply by turning it off and on again.
LEDs Not Working
If the LEDs don’t light up, verify the positive and negative orientations. Reversing these connectors will prevent the LEDs from functioning. It’s also worth checking the motherboard manual to ensure you have connected the LED wires to the correct headers.
In some cases, the LEDs might be faulty themselves, so testing them with a different power source can help diagnose the problem. Ensure there are no bent pins on the connectors.
No Beep from the Speaker
If the speaker doesn’t beep during boot, check the connection and ensure it’s on the correct pins. Some motherboards might not have a speaker, so consult your manual. The absence of a beep can also indicate deeper issues, such as issues with the RAM or CPU.
Tips for a Smooth Installation
Here’s what to do for a smooth connecting process:
Use Tweezers for Precision
Tweezers are your best friend when you’re trying to place those tiny connectors on the pins, especially in cramped spaces. They let you handle small parts without dropping or misaligning them.
Refer to the Manual
Your motherboard and case manuals are gold. If you’re ever unsure about a connection, always check them. These manuals have detailed diagrams and instructions that show you exactly where and how to place connectors. Following the manual can help you avoid mistakes that might damage your hardware or cause malfunctions.
They also have troubleshooting tips for common issues, so keep them close by during installation.
Take Your Time
Don’t rush it. Taking your time ensures that you connect everything correctly and avoid potential problems. Going slow lets you double-check each connection, making sure it’s secure and properly aligned. Rushing can lead to mistakes like loose connections or improperly seated components, which can cause system instability or failures.
Patience during installation can save you from frustration and potential rework later, giving you a more reliable and stable system setup.
The Bottom Line
With this guide and a little patience, you’ll nail connecting front panel connectors to the motherboard in no time. Just remember to take it slow, keep your manuals handy, and grab the right tools. Before you know it, your PC will be up and running smoothly.